
Firstly to reiterate the vision:
To create a fast paced, trippy and short video which quickly summarises my time here at the Oratory School (seven years!).
While I was working on collecting all the photos and filler-video I would need to achieve this a more detailed approach occurred to me:
Quickly flick photos, in reverse chronological order, while displaying a monotonous part of my life at the school.
I collected all the photos I could find that might be useful. Click here to download .rar of all the photos used (169Mb). (You will need a suitable program to extract the photos from this file, I suggest WinRAR although WinZIP should be able to aswell).
The photos were collected from various personal sources, such as archival CDs and friends, they were viewed in ACDSee which is a very fast and useful program:
Left is a screenshot of typical use of ACDSee, which I use almost everyday. It is similat to Windows Explorer, except that it is only concerned with photographs. On the left of the shot you can see the usual explorer folder list. Under that there is a small preview of the selected photo, and on the right are thumbnail views of all the photos.
Other views allow you to black the entire screen, and show only the selected photo at actual size, or zoomed in or out. You can also use detailed list view, where all the files in a folder are tabulated and their information summarised, allowing me to sort them by image dimension, file size (=quality), file type (which is useful for quickly finding layered photoshop files, or animated GIFs).
Pictured left are some of the photos I used at the beginning of the video, these are taken during Open Day week, where the Upper Sixth ( my year ) traditionally play pranks on the school to "make their mark" before we go!
The photo sequence in the video starts with the most recent pictures ( last few weeks ) and the progresses backwards in time to some of the earliest photos I have. Now that the video is done I regret that I used some photo studies of the school to fill in the time - I should have dug a little deeper into my collection and pull the photos I have from my time in Forth Form and even before.
This video portion was to be something dreary.. something that I have done 1000s of times before and never thought of; I wanted it like this because it would set the scene and portray the school better. I chose to film the trip up to Junior House and back. I have done this trip so many times that I could never count them! I used some special effect to add to the initial confusion of the "energy burst" that I was hoping to achieve. All in all it worked out very well, the colour effect I used ( negative sepia ) supplemented the greyscale photos being displayed, and in the later part of the short video the greyscale video supplemented the colour photos - which was an unexpected blessing!
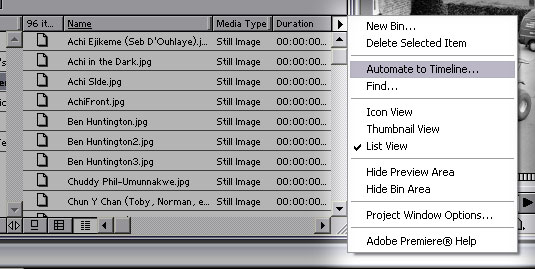
All the collected photos were assembled in Adobe Premiere 6.0, in what it calls "bins". The darker portion of the picture to the right is one of the many bins containing photos.
The lighter portion is the pull down menu for the bin, in the menu I can choose how to view the list of photos (Icons, thumbnails or the current list format) and it also can do some more mundane things such as search delete etc. What I was interested in was the "Automate to timeline" function.
This feature allows me to make some choices on how exactly to automate them to the timeline, and then Premiere does it. In other words I choose where to put all the picutres and how they should fade into each other etc. This is the equivalent to editing in the film industry.
 This
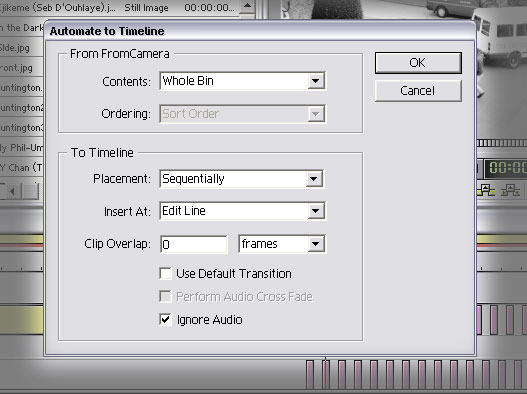
is the dialog box which comes up after choosing the "Automate to Timeline"
function.
This
is the dialog box which comes up after choosing the "Automate to Timeline"
function.
The top section "From FromCamera" is a misleading title, you see the name of the current photo bin is "FromCamera". Effectivly the top is from X, and the bottom is to Y.
I have chosen to use the entire contents of the photo bun, and to send them sequentially to the timeline, starting at where my editline is placed.
The edit line is a visual aid on the timeline which shows you where you are currently in time. If I was to press delete, the layers underneath the timeline will be deleted. Clip Overlap is to do with transitions ( as you can see I have unticked this below ). If transitions were on I could send loads of 30seconds video clips to the timeline and have them all crossfade for so-many seconds. The so-many is how long the clips overlap. Of course something other than crossfade can be the default transition.
I am not sure what "ignore audio" does, but as I was not concerned with it, it seemed safe to ignore it. I suspect it is to do with automating videos to the timeline; not still pictures.
After clicking OK I realised that each of my photos was taking up about 10 seconds on the timeline, which is not the outcome I wanted at all.
After a little deliberation I found that I needed to change the default length of time for a photo, I could have done each one manually, but there were a LOT of photos.
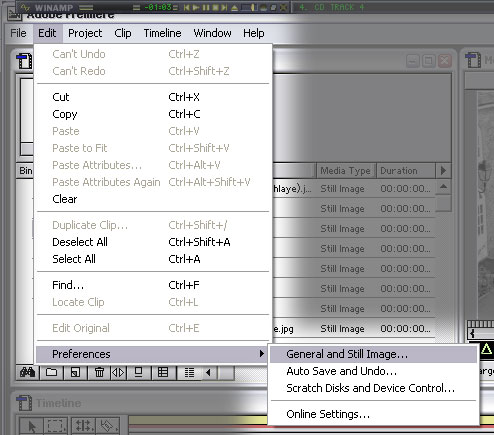
By choosing "General and Still Image" Prefrences from the edit menu I would be able to see the default settings for imported still images.
Of course this means that I will need to re-import all the photos. But that will be conisderably quicker than changing the length of each photo manually.
To explain this a little clearer. In digital video editing the moving image is made up of a quick succsession of still frames ( unlike in analouge where frames are made up of interlaces feild lines ). This means that, unlike in analogue film making where a still picture is not really comparable to a moving video, in digital editing one still picture is considered one frame. For most uses this is far too short and Premiere sets a default length for a still. This is the assumed length of time for which a still will last.
 Here
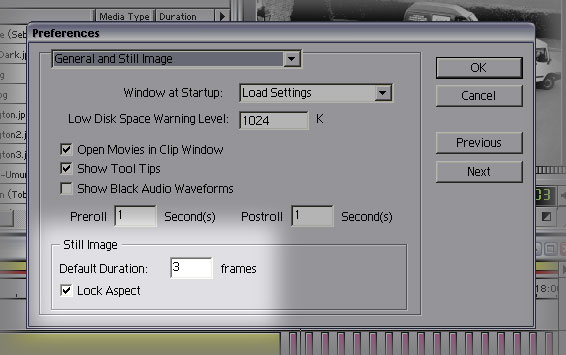
is the dialog for "General and Still Image Preferences".
Here
is the dialog for "General and Still Image Preferences".
Window at startup is concerned with the layout of the entire program at startup (please see the first photo on this webpage). Low diskspace warning in this case means that if the computer has less than 1024Kb free (which is exactly 1Mb) then a warning will be sent to me, the user. This is redundant on my system becuase if I have less than 200Mb free windows will start coughing up blood, so to speak.
Open movie in clip window means that when I open a video in Premiere it appears in a window, and is not sent straight into a bin. Fairly obvious I would think, but you would be suprised the number of programs that simply import files without allowing you, the user, to review them!
I am only interested in the light portion of the picutre, the still image settings - here I have set the default length to 3 frames, which is 3/25ths of a second. I found (after a lot of tinkering) that this is just long enough to make out what it is, but just short enough so as you cannot recognise any details. Of course I am at an advantage, I took the photos and I know what to look for - but I feel that as I am the author my feelings are what count. I am making this art primarily for myself and my own enjoyment, and secondly for the examiner in the hope of a grade.
Once the timeline is ready and I am happy with the layout of all the clips I will choose to export the timeline to a video, usually a low resolution one so that I can see how it all fits together without having to wait hours. Exporting videos that use a lot of special effects is a very power-hungry process.
The other main choices on the File menu allow you to include previous efforts at editing ( open ) and also to undo all changes sine you last saved ( revert ).
Capture in concerned with "capturing" images and videos from external sources. Such as a scanner (for still images) but Premiere comes into its own when you want to capture video. The traditional method, which is soon be known as the dated method, is to use a capture card and press record at the right time, exactly like using a VCR at home - the new way is far superior, but only works with Digital Video sources, such as modern day camcorders. Digital Video travels down a IEEE1394 interface, nicknamed Firewire becuase it is fast, and firewire is far more attractive name than IEEE1394!
When using Digital Video you can simply type in a load of start and end times and the computer will take control of the camcorder and rewind to the exact frame you specified in the time and start capturing it to the computer, then stop at the allocated time, forward to the next take you want a copy of and capture that etc. This allowed me to select a lot of takes I wanted to use in the Oratory Hell 2 Music Video ( please see tape 002 ) and set it going while I worked on someother things elsewhere. Also, the use of firewire allows the video to be captured faster than realtime ( this is accepted computer talk which roughly translates as "doing something faster than just watching/listening to it normally").
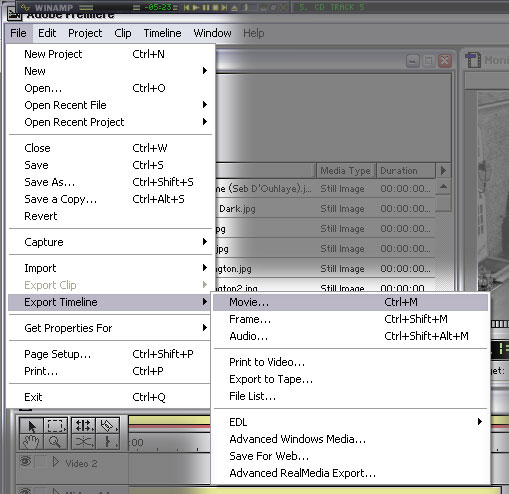
In the export time line submenu you can see the different selections. Some of the more interesting ones are "Print to video" whcich allows the timeline to be sent to a suitable video recorder frame by frame, which also allows frames to be sent to a reel of film for instance. The lower section is for exporting to Online Streaming Media (meaning you can download and watch the video at the same time - sadly I cannot demonstrate this due to server restrictions, and the limitations of the internet connection which this Examination Journal will be displayed on.
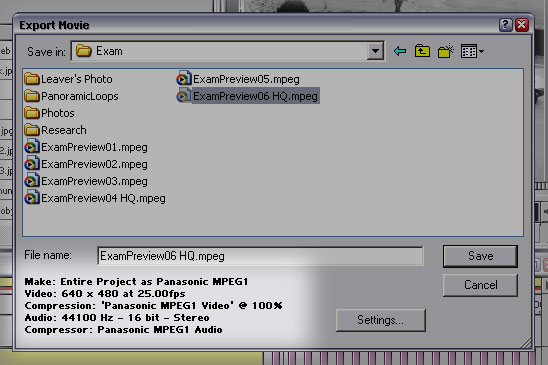
Exporting Movie allows me to turn the timeline into a video file, much like the files I assembled on the timeline.
Panasonic MPEG1 is a slightly dated standard which allows the video to be compressed without too much quiality loos - and it is a widely accepted standard, meaning most people who download it will be able to watch it.
The video settings are the dimensions of the video and the framerate (25 for PAL). The Audio is set to CD quality (44100Hz 16bit Stereo). I choose a name and voila!
To download the video please click here.